How to Create an Image Dataset from Google Images
Easily Create an Image Dataset By Scraping Google Images
This tutorial will show you how to create an image dataset in under 10 minutes using some Javascript and a few lines of code in Python (using the FastAI library).
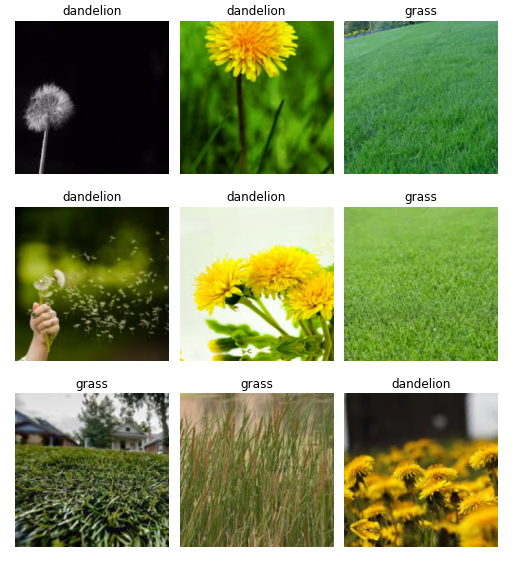
As an example, let’s create an image dataset of dandelions and grass.
Open a JupyterHub Environment on Binder
![]()
Click the above badge to access the JupyterHub environment, and open the notebook create-dataset.ipynb. The JupyterHub environment is hosted on Binder. Binder turns your git repo of notebooks into a hosted JupyterHub environment online, making your code repoducible anyone, anywhere. That means you don’t need to install anything to run this tutorial.
Note: this environment already has the csv files created from these instructions, so if you don’t want to create your own dataset, feel free to just run through the notebook :)
Save a list of Google Image URLs into a csv file
Go to Google Images and search for grass. Initially, there will be ~50 images, so scroll down and press the button ‘Show more results’ at the end of the page until ~100 images have loaded.
Now you must run some Javascript code in your browser which will save the URLs of all the images you want for you dataset.
Press CtrlShiftJ in Windows/Linux and CmdOptJ in Mac, and a small window the javascript ‘Console’ will appear. That is where you will paste the JavaScript commands.
Run the following commands in the prompt:
urls = Array.from(document.querySelectorAll('.rg_di .rg_meta')).map(el=>JSON.parse(el.textContent).ou);
window.open('data:text/csv;charset=utf-8,' + escape(urls.join('\n')));
The browser will download the file. Name the file grass.csv.
Repeat the same steps above for dandelion, and save the respective file as dandelion.csv.
Then, we’ll run some FastAI methods to download the images from the URLs into the dataset folder data/ using the download_images function. These methods make it extremely easy to create a dataset :)
Set the classes:
classes = ['grass','dandelion']
Download grass images to the directory data/grass from the URLs in grass.csv
folder = 'grass'
file = 'grass.csv'
path = Path('data/')
dest = path/folder
dest.mkdir(parents=True, exist_ok=True)
download_images(path/file, dest, max_pics=200)
Download dandelion images to the directory data/dandelion from the URLs in dandelion.csv
folder = 'dandelion'
file = 'dandelion.csv'
path = Path('data/')
dest = path/folder
dest.mkdir(parents=True, exist_ok=True)
download_images(path/file, dest, max_pics=200)
Then, we’ll make sure all the images are valid using verify_images.
for c in classes:
    print(c)
    verify_images(path/c, delete=True, max_size=500)
After that, we’ll create our dataset from ImageDataBunch using the folder of images we just created, in just one line:
np.random.seed(42)
data = ImageDataBunch.from_folder(path, train=".", valid_pct=0.2,
        ds_tfms=get_transforms(), size=224, num_workers=4).normalize(imagenet_stats)
Now let’s view our data and see that we have a dataset. Congrats, you now have created your own image dataset!
data.show_batch(rows=3, figsize=(7,8))